Wow! What a busy time it’s been!
So I was on TV again on 4th May with a collection
that is super special to me. I’ve been lucky enough to have had some of my
designs printed and brought to air! I was very excited to say
the least! So here it is!!
CARNIVAL -it’s a fun, colourful, cheery paper collection
comprising 6 designs. There’s a candy stripe, a turquoise sunburst, confetti,
rows of bumper cars, tickets and alphabet bunting! There really is so much in
this kit. Being designed by a crafter, for crafters, every element has a
purpose.
Here’s what the collection looks like:

And here’s the stamps:

All the imagery has been hand drawn by myself and Craftwork
Cards have turned them into beautiful stamps for us crafters! There’s a
carousel horse, bumper car, fairground wording, flourishes, stars, fairground
lights and so much more!
The TV show was so jam-packed that there wasn’t enough time
to do all my demos so I thought I’d share them on here with you. So you’re not
missing out!
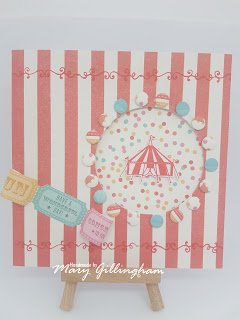
This card was made using both the paper pad and candi and
also the Carnival stamps.
- Cover the front of the card with the candy stripe paper and cut a circle out of the front. You can either draw around a household object and cut it out with a knife or you can run it through a die cutting machine.
- Stick a square of the confetti paper on the inside of the card.
- Taken the flourish stamp and stamping in red, stamp across the top of the card, about ¾” from the top and repeated this across the bottom of the card.
- Cut out a strip of 3 tickets from the ticket paper and shape it by curling it around a pen or round tool. Stick to the front.
- Stick candi around the edge of the aperture.
- Stamp the big top in the same red ink onto some smoothing stamping card and carefully cut around it with a knife; then layer it on 3D foam in the centre.
What I really like about this card, is that it would suit a
male or female recipient and also you could change it round by using the
different stamps, for example, using the carousel horse in the aperture.
A really simple card made just with the paper pad, yet still
highly effective:
- Stick the confetti paper as a background on the front of your card blank.
- Cut 2 strips of tickets. It just so happens that 4 tickets fit perfectly along the top and bottom of the card as border strips! How cool is that?!
- Cut out the bunting to write your message on the front. I went for ‘Lets Go Party’ but you can choose whatever message you fancy – the only restriction is the size of your card!
This card was made using just the stamps!!
- Stamp the ticket all over the card front, then using just 4 colours, coloured them in and cut some of them out to reveal ticket shaped apertures.
- Stamp the 'Celebrate' word onto a small rectangle with the flourish above and below, to add to the fairground look of it and stuck it to the front with 3D foam to add a bit of depth to the card.
A really simple, colourful, fun card but just with the stamps.
You could use this effect if you'd bought someone tickets for a present and change the colour scheme to whatever suits you - a little like a bespoke gift card for tickets!
Another super fun card!
So I had time to demonstrate how to make a banner flag card from a card blank - did everyone catch it?
- Mark the centre point, connect the centre point with one of the bottom corners with a ruler and cut. Do the same again from the centre point to the other bottom corner to cut out the triangle.
- Cover the card with the amazing starburst paper, this really draws the eye into the card!
- Make a pinwheel from the candy stripe paper.
- Stamp some extra stars on the background and add candi in the corners.
- Stamp the 'PARTY' word onto a small rectangle and layered this on the front.
Perfect for any fun occasion, whether it's a party invitation or a birthday card!
Here’s some more carnival cards that I did for the show – I’d
love to know what you think- either about my designs for the papers and stamps
or the sample cards. Or even comment to share what your favourite fairground
ride is!!


I hope you enjoy the collection!
Take care and happy crafting!


